

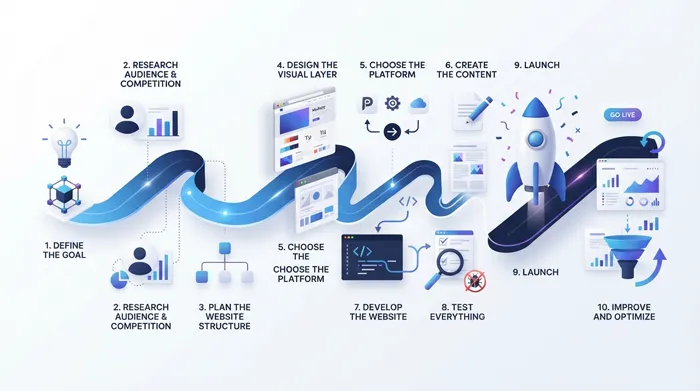
Step-by-Step Web Design Process: From Idea to Launch
Most website projects don't fail because of bad design. They fail because nobody mapped out the process before jumping into it — pages get built in the wrong order, content gets bolted on at the last minute, and by launch day everyone's just relieved it's over rather than proud of what they shipped. A website built with an actual process behind it looks different, loads faster, and tends to convert better, simply because nothing was left to guesswork.
Here's what that process actually looks like, stage by stage, from the first vague idea to the moment the site goes live.
Step 1: Get Clear on the Goal Before Anything Else
Every strong website starts with a question that's easy to skip past: what is this site actually supposed to do? Generate leads, sell products directly, build brand credibility, support an existing offline business — the answer changes almost everything downstream, from the layout to the tone of the copy to which pages even need to exist. Skipping this step is how businesses end up with a beautiful site that doesn't actually move the needle. If you're still deciding between a fast, template-based build and something fully custom, it's worth reading through this comparison of website builders and custom web design before locking anything in, since the right foundation depends entirely on the goal you just defined.
Step 2: Research the Audience and the Competition
Once the goal is clear, the next question is who the site actually needs to speak to. What are they searching for, what convinces them to trust a business online, and what do they expect to find within the first few seconds of landing on a page? Alongside that, it's worth taking an honest look at what competitors are doing — not to copy them, but to understand the baseline visitors are already comparing you against. Skipping this stage is a common reason sites end up looking generic; a quick look at some proven strategies for e-commerce website design can help sharpen exactly what to aim for before design work even starts.
Step 3: Plan the Structure Before Touching Any Design Tool
This is the step people are most tempted to skip, and it's usually the one that costs the most later. Planning the sitemap — which pages exist, how they connect, what the navigation looks like — forces decisions that are painful to change once a site is half-built. A simple flowchart of pages and their relationships is often enough — the same planning instinct covered in this complete guide to responsive web design. Get this part right, and everything after it moves faster.
Step 4: Design the Visual Layer
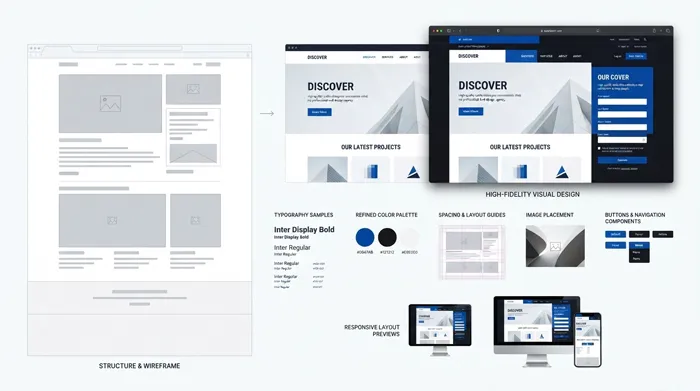
With the structure locked in, design work can actually begin — wireframes first, then the real visual design: color palette, typography, imagery, and the overall feel of the brand translated into a screen. This is also where mobile responsiveness needs to be considered from day one rather than patched in afterward, since most visitors to any modern site will be on a phone before they're ever on a desktop. A deeper look at how design choices affect user experience is worth reading here, since a page that looks good but confuses people to click away isn't actually doing its job.
Step 5: Choose the Right Platform for the Job
This decision tends to get made too early or too late — either locked in before anyone knows what the site actually needs, or left until the last minute under pressure to launch. The right platform depends on the goal set back in step one: a simple brochure site has very different needs than a store selling hundreds of products. This is a good point to weigh a straightforward website builder against WordPress, since each comes with real trade-offs in flexibility, maintenance, and cost that are much easier to absorb before development starts than after.
Step 6: Build the Content Alongside the Design, Not After It
One of the most common mistakes in web design is treating content as an afterthought — designing every page first and then scrambling to write copy that fits the space left over. Content and design work best when they develop together, since the words on a page often reveal that a section needs to be restructured, or that a page nobody planned for is actually necessary. Every headline, product description, and call-to-action should be written with the same intention as the layout around it.
Step 7: Development and Technical Setup
This is where the site actually gets built — templates get implemented, custom features get coded, forms get connected, and everything that was designed on screen becomes something people can actually click through. It's also the stage where technical fundamentals matter most: clean code, sensible URL structures, and a site that loads quickly rather than one bloated with unnecessary scripts. Getting the fundamentals right here pays off directly in how the site affects sales later, since speed and usability are rarely separate from conversion in practice.
Step 8: Test Everything Before Anyone Else Sees It
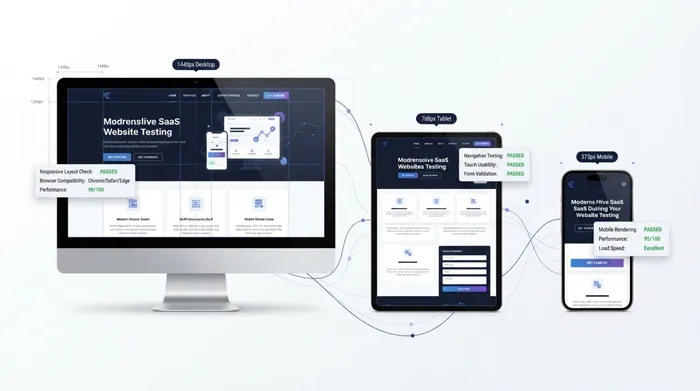
Before a single visitor arrives, the site needs to be tested properly — every link clicked, every form submitted, every page checked across different browsers and screen sizes. This is also the moment to confirm the site behaves the same on mobile as it does on desktop, since a broken mobile experience quietly costs more conversions than almost anything else on this list. Skipping this step to save time almost always costs more time later, once real visitors start finding the bugs instead.
Step 9: Launch, Then Actually Watch What Happens
Launch day isn't really the finish line — it's the point where real data starts coming in. Analytics, heatmaps, and actual user behavior will tell you things no amount of planning could predict: which pages people skip, where they drop off, what they click that you didn't expect them to. A site that's genuinely finished is one that gets adjusted based on what real visitors do, not just what the original plan assumed they'd do.
Step 10: Treat Launch as the Start, Not the End
The businesses that get the most out of their website are the ones that keep improving it long after launch — updating content, refining pages that underperform, and adding new features as the business itself grows. A website is closer to a living asset than a one-time project, and treating it that way tends to be the difference between a site that quietly stagnates and one that keeps paying off. If ongoing growth is genuinely the goal, it's worth looking at what a platform built for that kind of continuous improvement, like Webruno's plans, actually offers before deciding how to maintain things long-term.
Bringing It All Together
A website built with a real process behind it looks different from one thrown together in a rush — not necessarily because of a bigger budget, but because nothing important got skipped. Define the goal, understand the audience, plan the structure, design and write with intention, build on the right platform, test thoroughly, and keep improving after launch. Follow that order, and the site that comes out the other end tends to actually do what it was built for.